.jpg)


How To Create A Database Design In Excel: Step By Step Guide
Database design in Excel involves organizing data efficiently to ensure accessibility, accuracy, and usability. Excel, primarily a spreadsheet tool, can function as a simple database by structuring data into tables with rows and columns. Each row represents a record, and each column represents a field, forming a relational-like structure.
Effective database design in Excel requires defining clear data types, establishing consistent naming conventions, and avoiding redundant data to minimize errors. Features like tables, filters, and pivot tables enhance data management, enabling users to sort, query, and analyze information effectively.
While Excel is not a replacement for robust database systems like SQL Server, it suits small-scale projects or personal data management due to its user-friendly interface and flexibility. Proper design ensures data integrity, simplifies analysis, and supports scalability within Excel’s limitations.
Table of Contents
What Database Does Excel Use?
Microsoft Excel doesn’t use a traditional database management system (DBMS) like SQL Server or MySQL. Instead, it functions as a spreadsheet application that can mimic a simple database by organizing data into tables with rows and columns. Each table in Excel acts like a flat-file database, where rows represent records and columns represent fields.
Excel stores data directly within its workbook files (.xlsx or .xls), using a proprietary file format based on XML or binary structures. It relies on its internal data model for managing and querying data, especially when using features like Power Query or Power Pivot, which support connections to external data sources.
While Excel can import data from external databases (e.g., SQL, Access) via ODBC or other connectors, its core “database” is the spreadsheet itself, not a separate DBMS.

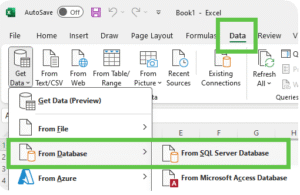
How To Create A Database Design In Excel?
Creating a database design in Excel involves structuring your data in a way that mimics a relational database, with organized tables, clear relationships, and consistent data entry. Excel is not a true database management system, but it can be used effectively for simple database purposes with proper planning. Below is a step-by-step guide to create a database design in Excel:
1. Plan Your Database
- Define the Purpose: Determine what data you need to store and how it will be used. For example, are you tracking customers, inventory, or sales?
- Identify Entities: Break down your data into logical entities (e.g., Customers, Orders, Products). Each entity will become a separate table.
- Determine Attributes: List the properties (fields) for each entity. For example:
- Customers: CustomerID, FirstName, LastName, Email, Phone
- Orders: OrderID, CustomerID, OrderDate, TotalAmount
- Products: ProductID, ProductName, Price, Stock
- Establish Relationships: Decide how entities relate (e.g., a Customer can have multiple Orders). Use primary keys (unique identifiers like CustomerID) and foreign keys (references to primary keys in other tables) to link tables.
2. Excel Workbook
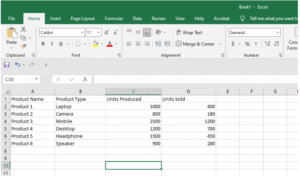
- Create a New Workbook: Open Excel and create a new workbook.
- Use Separate Sheets for Each Table: Dedicate one sheet per entity (e.g., “Customers,” “Orders,” “Products”).
- Name each sheet clearly to reflect the entity it represents.
- Save the Workbook: Save your file with a descriptive name (e.g., BusinessDatabase.xlsx).
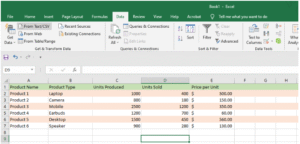
3. Design Each Table
Set Up Columns:
- In each sheet, use the first row for column headers (field names).
- Ensure headers are clear and unique (e.g., CustomerID, FirstName, etc.).
- Include a primary key column for each table (e.g., CustomerID for Customers).
Standardize Data Types:
- Decide on data formats for each column (e.g., text, number, date).
- Use consistent formats to avoid errors (e.g., use YYYY-MM-DD for dates).
4. Implement Data Integrity
- Use Data Validation:
- Go to Data > Data Validation to enforce rules, such as:
- Ensuring CustomerID is unique (use a custom formula like =COUNTIF(A:A,A2)=1).
- Restricting entries to specific formats (e.g., email format, date ranges).
- Creating dropdown lists for fields with limited options (e.g., ProductCategory).
- Avoid Duplicates:
- Use Conditional Formatting to highlight duplicate primary keys:
- Select the primary key column (e.g., A2:A100). Database design in excel can help you to meet your goals with ease.
- Go to Home > Conditional Formatting > New Rule > Use a formula and enter =COUNTIF(A:A,A2)>1.
- Set a format (e.g., red fill) to flag duplicates.
- Freeze Headers:
- Select the first row and go to View > Freeze Panes > Freeze Top Row to keep headers visible.
5. Create Relationships Between Tables
Use VLOOKUP or INDEX/MATCH:
- To link data across sheets, use formulas like VLOOKUP or INDEX/MATCH.
- Example: In the Orders sheet, retrieve a customer’s name based on CustomerID
- This combines FirstName and LastName from the Customers sheet.
Create a Lookup Table (Optional):
- If you have small, static lists (e.g., Product Categories), create a separate sheet for lookup values and reference it using Data Validation or formulas.
6. Add Data Entry Features
Create a Data Entry Form:
- Go to Data > Form (if available in your Excel version) to create a simple form for adding records.
- Alternatively, use VBA to create a custom user form for easier data entry.
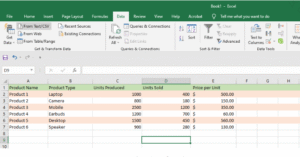
Use Filters:
- Enable filters (Data > Filter) to allow sorting and searching within each table.
Add Input Templates:
- Create a template row with pre-filled data validation and formatting to guide users entering new data.
7. Analyze & Query Data
Use PivotTables:
- Go to Insert > PivotTable to summarize data (e.g., total sales per customer).
- Place PivotTables on a separate sheet for clarity.
Use Formulas for Queries:
- Use functions like SUMIFS, COUNTIFS, or AVERAGEIFS to perform database-like queries.
- Example: Calculate total orders for a specific customer:
excel
=SUMIFS(Orders!D:D, Orders!B:B, “C001”)
Create Charts (Optional):
- If you want to visualize data, select your data and go to Insert > Chart (e.g., bar chart for sales by customer).
- Example: To show total sales per customer, select the relevant data and insert a bar chart.
8. Maintain & Secure The Database
Regular Backups:
- Save copies of your workbook regularly to avoid data loss.
Protect Sheets:
- Go to Review > Protect Sheet to prevent accidental changes to your tables.
- Set a password if needed, but keep it secure.
Document the Design:
- Create a separate sheet (e.g., “Documentation”) to describe:
- Table structures (fields, data types, primary/foreign keys).
- Relationships between tables.
- Any formulas or rules used.
Few related topics for your knowledge
- Quick Analysis Tool Excel: Where To Find & How To Use
- Custom Number Formatting In Excel: Learn Amazing Tricks To Employ
- Top 25+ Shortcut Keys For Excel: Work Like A Pro
- How to Use Python in Excel – Tutorial and Tips
- Master The Visual Basic Editor In Excel
- Flash Fill In Excel: What Is it & Step By Step Tutorial
How To Design Database In Access?
Designing a database in Microsoft Access involves creating a structured system to store, manage, and retrieve data efficiently using a relational database model. Access is a powerful tool for small to medium-sized databases, offering a user-friendly interface and integration with other Microsoft Office applications. Below is a step-by-step guide to designing a database in Microsoft Access.
1.Plan Your Database
- Define the Purpose: Identify the goal of your database (e.g., managing customers, tracking inventory, or recording sales).
- Identify Entities: Break down your data into logical entities (e.g., Customers, Orders, Products). Each entity becomes a table.
- Determine Attributes: List the fields for each entity. For example:
- Customers: CustomerID, FirstName, LastName, Email, Phone
- Orders: OrderID, CustomerID, OrderDate, TotalAmount
- Products: ProductID, ProductName, Price, Stock
- Establish Relationships: Define how tables relate (e.g., a Customer can have multiple Orders). Use primary keys (unique identifiers) and foreign keys to link tables.
- Normalize the Database: Apply normalization rules to eliminate redundancy and ensure data integrity:
- 1st Normal Form (1NF): Ensure each field contains atomic (indivisible) values, and each record is unique.
- 2nd Normal Form (2NF): Ensure all non-key fields are fully dependent on the primary key.
- 3rd Normal Form (3NF): Remove fields that depend on non-key fields.
2. Create A New Database In Access
- Open Microsoft Access:
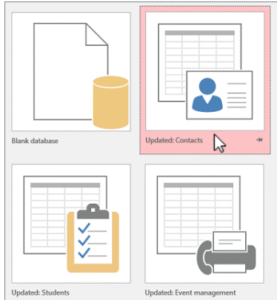
- Launch Access and select File > New > Blank Database.
- Name your database (e.g., BusinessDatabase.accdb) and choose a save location.
- Understand the Interface:
- The Navigation Pane on the left lists all database objects (tables, queries, forms, reports).
- The Ribbon at the top provides tools for designing and managing the database.
3. Create Tables
Create a New Table:
- Go to Create > Table to start a new table in Datasheet View.
- Switch to Design View (right-click the table in the Navigation Pane and select Design View) for more control.
Define Fields:
- In Design View, enter field names and select appropriate data types (e.g., Short Text for names, Number for IDs, Date/Time for dates, Currency for prices).
Set a Primary Key:
- Select a field (e.g., CustomerID) and click Primary Key in the Tools group on the Design tab.
- Use AutoNumber for primary keys to automatically generate unique IDs.
Add Field Properties:
- In the lower pane of Design View, set properties like:
- Field Size: Limit text length (e.g., 50 characters for Email).
- Required: Ensure critical fields (e.g., Email) are not left blank.
- Input Mask: Enforce formats (e.g., (000) 000-0000 for Phone).
Repeat for Other Tables:
- Create additional tables (e.g., Orders, Products) with their own fields and primary keys.
4. Establish Relationships
Open the Relationships Window:
- Go to Database Tools > Relationships.
Add Tables:
- Drag the tables (e.g., Customers, Orders) into the Relationships window.
Create Relationships:
- Drag the primary key (e.g., CustomerID from Customers) to the corresponding foreign key (e.g., CustomerID in Orders).
- In the Edit Relationships dialog, check Enforce Referential Integrity to ensure valid relationships (e.g., no Orders can exist without a valid CustomerID).
- Select Cascade Update Related Fields and Cascade Delete Related Records if you want changes/deletions in the primary table to propagate to related tables.
Save the Relationships: Click Create and save the relationship layout.
5. Add Data In Tables
Enter Data in Datasheet View:
- Double-click a table in the Navigation Pane to open it in Datasheet View.
- Enter data directly, ensuring adherence to field properties (e.g., data types, required fields).
Import Data (Optional):
- If you have existing data (e.g., in Excel), go to External Data > New Data Source > From File > Excel to import it into a table.
- Map columns to fields and ensure data types match.
6. Create Queries
Design Queries:
- Go to Create > Query Design.
- Add relevant tables and select fields to include in the query.
- Use criteria to filter data (e.g., >100 in TotalAmount to show orders over $100).
Common Query Types:
- Select Query: Retrieve specific data (e.g., all orders for a customer).
- Update Query: Modify data (e.g., increase prices by 10%).
- Append Query: Add records to a table.
- Delete Query: Remove records based on criteria.
Save and Run:
- Save the query with a descriptive name (e.g., CustomerOrders) and run it by clicking Run (exclamation mark) in the Design tab.
7. Create Forms For Data Entry
Create a Form:
- Go to Create > Form Wizard or Form Design.
- Select a table or query as the data source.
- Choose fields to include and a layout (e.g., Columnar, Tabular).
Customize the Form:
- In Design View, add controls like text boxes, combo boxes (for dropdowns), or buttons.
- Example: Create a form for entering Orders, with a dropdown for CustomerID linked to the Customers table.
Use the Form:
- Open the form in Form View to enter or edit data easily.
8. Create Reports
Generate a Report:
- Go to Create > Report Wizard.
- Select a table or query, choose fields, and set grouping/sorting options (e.g., group by CustomerID).
Customize the Report:
- In Design View, adjust the layout, add logos, or include calculated fields (e.g., sum of TotalAmount).
Preview and Export:
- View the report in Print Preview and export to PDF or print as needed.
9. Maintain & Secure The Database
Compact and Repair:
- Go to File > Info > Compact & Repair Database to optimize performance and fix errors.
Back Up Regularly:
- Use File > Save As > Back Up Database to create periodic backups.
Secure the Database:
- Set a database password via File > Info > Encrypt with Password.
- Split the database (Database Tools > Move Data > Access Database) into a front-end (forms, reports) and back-end (tables) for multi-user environments.
Document the Design:
- Use the Database Documenter (Database Tools > Database Documenter) to generate a report of all objects, fields, and relationships.
What Are Relational Databases In Excel?
A relational database in Excel refers to a structured way of organizing data across multiple tables (or sheets) in an Excel workbook, where the tables are linked through common fields, mimicking the behavior of a true relational database management system (RDBMS) like Microsoft Access or SQL Server. While Excel is primarily a spreadsheet application and not a true RDBMS, it can simulate a relational database for small-scale data management by using tables, unique identifiers (primary keys), and formulas or features to establish relationships between datasets.
Key Components Of A Relational Database In Excel
1. Tables
- Each entity is stored in a separate Excel sheet or an Excel Table (created via Insert > Table).
- Example: A “Customers” sheet for customer data, an “Orders” sheet for order data, and a “Products” sheet for product details.
- Use Excel Tables for better structure, as they offer automatic formatting, filtering, and dynamic ranges.
2. Primary Keys
- A unique identifier for each record in a table (e.g., CustomerID, OrderID).
- Example: In the Customers sheet, assign each customer a unique CustomerID (e.g., C001, C002).
3. Foreign Keys
- A field in one table that matches the primary key of another table to establish a relationship.
- Example: In the Orders sheet, include a CustomerID column that references the CustomerID from the Customers sheet.
4. Relationships
- In Excel, relationships are not enforced like in Access but can be simulated using formulas (e.g., VLOOKUP, INDEX/MATCH) or Power Query.
- Example: Link Orders to Customers by using VLOOKUP to retrieve customer names based on CustomerID.
Final Takeaway
Hence, these are some of the crucial ways to create a database design in Excel. You need to be well aware of the steps while implementing it in your system. Try to develop the best solution that can assist you to meet your requirements with ease.
You can share your views and comments in our comment box as this will help us to know your take on this matter. We value your feedback and it is important for us to know your take on this matter.