.jpg)


How To Use Mail Merge In Word
Mail merge in Word is a powerful feature that streamlines the creation of personalized documents, such as letters, emails, or labels, by combining a main document with a data source. This process allows users to generate multiple customized documents from a single template, saving time and ensuring consistency.
The main document contains static content and placeholders (merge fields) that are replaced with data from sources like Excel spreadsheets, Access databases, or Outlook contacts. Mail merge is widely used for tasks like sending personalized invitations, creating mailing labels, or drafting bulk emails.
Automating repetitive tasks enhances efficiency, reduces errors, and enables professional communication tailored to individual recipients. With its user-friendly interface, Word’s mail merge wizard guides users through selecting templates, linking data, and previewing results, making it accessible for both beginners and advanced users.
Table of Contents
- What Is Mail Merge In Word?
- How To Mail Merge In Word?
- How To Use Mail Merge In Word From Excel?
- How To Use Mail Merge In Word With Excel Data?
- Step-by-Step Guide
- How To Use Mail Merge in Word For Envelopes?
- How To Use Mail Merge In Word For Letters?
- Step By Step Guide
- How To Use Mail Merge In Word To Create Labels?
- How To Do Mail Merge In Word & Outlook
- FAQ(Frequently Asked Questions)
- Final Takeaway
What Is Mail Merge In Word?
Mail merge in Microsoft Word is a feature that allows users to create personalized documents by combining a main document with a data source. The main document contains fixed content and placeholders (merge fields) that are populated with data from sources like Excel spreadsheets, Access databases, or Outlook contacts.
This process generates multiple customized documents, such as letters, emails, or labels, from a single template. For example, you can create a form letter addressed to different recipients by pulling names and addresses from a data source.
Mail merge streamlines repetitive tasks, saves time, reduces errors, and ensures consistency in professional communications.
Word’s mail merge wizard simplifies the process by guiding users through selecting a template, linking a data source, inserting fields, and previewing results, making it accessible for creating bulk personalized documents efficiently.
How To Mail Merge In Word?
Mail merge in Microsoft Word is a powerful tool that enables users to create personalized documents, such as letters, labels, or emails, by combining a main document with a data source. This process automates the insertion of unique data (e.g., names, addresses) into a template, producing multiple customized documents efficiently.
1. Create A New Address List
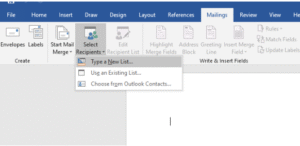
Launch Microsoft Word and go to the Mailings tab. Next, within the Start Mail Merge section, click the Select Recipients button and choose Type a New List. This enables you to build a fresh address list for your mail merge.
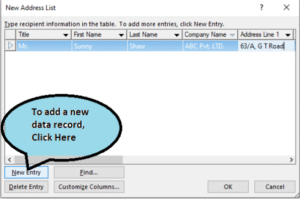
2. Enter Data In The New Address List Dialog
A window titled “New Address List” will pop up. Input the required information under the provided column headers. To include an additional record, select the New Entry button at the dialog’s bottom, then click OK once finished.
3. Prepare The Master Letter
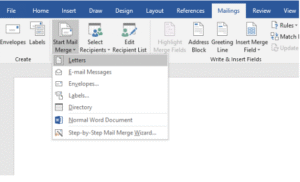
The next task is to set up your primary letter for the mail merge. Prior to adding the letter content, connect the Word document to your name list. Open a new blank Word document, navigate to the Mailings tab, select the Start Mail Merge section, and choose Start Mail Merge → Letters.
4. Link The Master Letter To Existing List
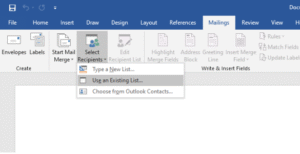
Access the Mailings tab, go to the Start Mail Merge section, and click the Select Recipients button. Then, opt for the Use an Existing List option to connect your primary letter to the pre-existing address list.
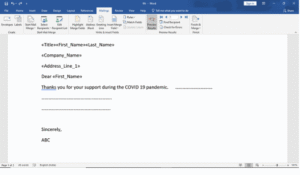
5. Start Typing The Letter & Insert The Merge Fields
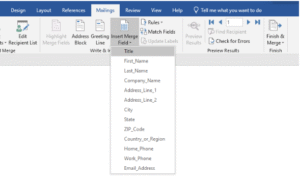
Start composing the letter’s content. To insert names, addresses, or other details from the list, navigate to the Mailings tab and, within the Insert & Write Fields section, select the Insert the Merge Field button. A dropdown menu will display all the table headers. Select Title, then hit the spacebar to add a space.
6. Add First Name, Address & Last Name
Continue by repeating the steps to select FirstName, then add a space (press only the spacebar, no other keys). Next, select LastName and press the Enter key to start a new line. After that, follow the same process to choose the Address field and press the Enter key once more.
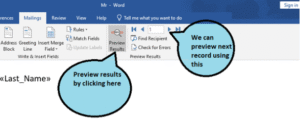
7. Preview The Merged Letters
Prior to executing the mail merge, review how the merged letters will look. Navigate to the Mailings tab, and within the Preview Results section, select the Preview Results button to view the merged fields in the document.
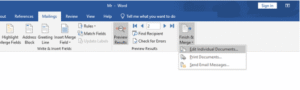
8. Carry Out The Mail Merge
After confirming the preview looks correct, navigate to the Mailings tab, access the Finish section, and click the Finish & Merge button. Choose Edit Individual Documents to execute the mail merge process.
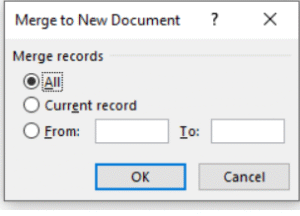
9. Create Separate Letters For Each Person
In the Merge to New Document window, select All to produce a distinct letter for each individual on the list. Word will create a new document with a page count matching the number of names in your list, each page featuring the accurately merged letter with the person’s specific details.
10. Save The Merged Documents
After completing the merge, save the resulting document with a suitable name, like ABC.docx, to maintain the organization of your merged letters.
How To Use Mail Merge In Word From Excel?
To perform a mail merge in Microsoft Word using an Excel data source, follow these steps to create personalized documents like letters, labels, or emails. This guide assumes you have an Excel file with data and a Word document ready for the merge.
1. Prepare Your Excel Data Source
Create or open an Excel spreadsheet with organized data. Ensure the first row contains clear column headers (e.g., FirstName, LastName, Address, Email). Each subsequent row should hold recipient data. Save the file (e.g., Contacts.xlsx) in an accessible location.
- Tip: Avoid blank rows, merged cells, or inconsistent formatting to prevent errors. Ensure data is clean (e.g., no extra spaces).
2. Setup Your Word Document
Open Microsoft Word and create or open a document to use as the main template. This document will include static text (e.g., the body of a letter) and placeholders for Excel data.
- Example: For a letter, include static content like the body text and leave space for personalized fields like names.
3. Initiate The Mail Merge
- Navigate to the Mailings tab on the ribbon.
- Click Start Mail Merge and select the document type (e.g., Letters, Labels, or E-mail Messages). For this example, choose Letters.
4. Link To File Excel
- In the Mailings tab, press Select Recipients and choose Use an Existing List.
- Browse to select your Excel file (e.g., Contacts.xlsx).
- If the Excel file has multiple sheets, a dialog box will prompt you to select the correct sheet containing your data. Click OK to confirm.
- Note: Word links to the Excel file dynamically, so changes in the file are reflected if saved before merging.
5. Insert Merge Field
- Position the cursor where personalized data should appear (e.g., after “Dear” for a greeting).
- Click Insert Merge Field in the Write & follow Insert Fields group. A dropdown will show your Excel column headers (e.g., FirstName, Address).
- Select fields to insert (e.g., «FirstName» «LastName»). Add spaces, punctuation, or line breaks (via Enter) as needed.
- Example: For an address block, insert:
6. Preview The Merged Document
- Click Preview Results in the Preview Results group to see how the document looks with Excel data inserted.
- Use the navigation arrows (Next Record, Previous Record) to review different records.
- If issues appear (e.g., missing data), check your Excel file for errors or use Match Fields to ensure correct mapping between Excel columns and Word fields.
7. Complete The Merge
Once the preview is correct, go to the Mailings tab and click Finish & Merge in the Finish group.
Choose an option:
- Edit Individual Documents: Generates a new Word document with a separate page for each recipient’s data.
- Print Documents: Sends the merged documents directly to the printer (e.g., for labels).
- Send E-mail Messages: Sends personalized emails if your Excel file includes an email column and email settings are configured.
For most cases, select Edit Individual Documents, then choose All in the Merge to New Document dialog to create documents for all recipients.
Word will produce a new document with one page per recipient, each populated with data from the Excel file.
8. Try To Keep The Output
- Keep the merged document (e.g., MergedLetters.docx) to keep the output organized.
- Optionally, save the main template document to reuse the mail merge setup later.
How To Use Mail Merge In Word With Excel Data?
To perform a mail merge in Microsoft Word using an Excel data source, you can create personalized documents such as letters, labels, or emails by combining a Word template with data from an Excel spreadsheet. Below is a detailed guide to help you execute a mail merge efficiently, assuming you have an Excel file and a Word document prepared.
Step-by-Step Guide
1. Set Up The Word Document
Launch Microsoft Word and open a new or existing document for your template.
- Navigate to the Mailings tab on the ribbon.
- Click Start Mail Merge and choose the document type: Letters, Labels, Envelopes, or E-mail Messages. For this example, select Letters.
2. Connect To The Excel Data Source
- In the Mailings tab, press Select Recipients and choose Use an Existing List.
- Browse to locate your Excel file (e.g., Contacts.xlsx) and select it.
- If the Excel file has multiple sheets, a dialog box will prompt you to select the sheet containing your data. Choose the appropriate sheet and click OK.
- Note: Word links dynamically to the Excel file, so updates to the file (if saved) will reflect in the merge.
3. Insert Merge Field
- Place the cursor in the document where you want to insert personalized data (e.g., after “Dear” for a greeting).
- Click Insert Merge Field in the Insert & Write Fields group. A dropdown menu will display the column headers from your Excel file (e.g., FirstName, LastName, Address).
- Select the desired fields, adding spaces, punctuation, or line breaks (via Enter) as needed.
- Continue adding fields where personalization is required.
4. Preview The Results
- Click Preview Results in the Preview Results group to see how the document looks with Excel data inserted.
- Use the navigation arrows (Next Record, Previous Record) to review different records and ensure accuracy.
- If data appears incorrect, check the Excel file for errors (e.g., missing data, mismatched headers) or use Match Fields to align Excel columns with Word’s expected fields.
5. Complete The Mail Merge
- Once the preview is satisfactory, go to the Mailings tab and click Finish & Merge in the Finish group.
- Choose one of the following options:
- Edit Individual Documents: Generates a new Word document with a separate page for each recipient’s merged data.
- Print Documents: Sends the merged documents directly to the printer (e.g., for labels).
- Send E-mail Messages: Sends personalized emails if your Excel file includes an email column and email settings are configured in Word.
- For most cases, select Edit Individual Documents, then choose All in the Merge to New Document dialog to create documents for all recipients.
- Word will produce a new document with one page per recipient, each populated with data from the Excel file.
6. Save The Merged Document
- Save the newly created document (e.g., MergedLetters.docx) to keep your merged output organized.
- Optionally, save the main template document to reuse the mail merge setup later.
Few related topics for your knowledge
How To Use Mail Merge in Word For Envelopes?
To use mail merge in Microsoft Word to create envelopes with data from a source like an Excel spreadsheet, Outlook contacts, or a new list, follow these steps. This guide focuses on generating personalized envelopes with recipient addresses, ensuring efficiency and accuracy.
1. Open Word & Set Up An Envelope Template
- Launch Microsoft Word and open a new blank document.
- Go to the Mailings tab on the ribbon.
- Click Start Mail Merge and select Envelopes from the dropdown menu.
- A dialog box labeled Envelope Options will appear. Choose the envelope size (e.g., Size 10, common for standard business envelopes) and adjust font settings for the delivery and return addresses if needed. Click OK.
- Word adjusts the document layout to match the envelope format.
2. Select Or Create Data Source
- In the Mailings tab, press Select Recipients and choose one of the following:
- Use an Existing List: Browse to select an Excel file (e.g., Addresses.xlsx). If the file has multiple sheets, select the correct sheet in the dialog box and click OK.
- Select from Outlook Contacts: Choose contacts from Outlook (requires Outlook integration).
- Type a New List: Click to create a new list in Word. A New Address List dialog will appear. Enter data under headers like Title, FirstName, LastName, Address, etc. Click New Entry to add more records, then click OK and save the list as a .mdb file.
- Tip: Ensure your data source has consistent formatting (e.g., no extra spaces) to avoid errors.
3. Insert Merge Fields On The Envelope
- Click in the delivery address area of the envelope template (Word typically positions this in the center).
- Within the Mailings tab, click Insert Merge Field in the Insert & Write Fields group. A dropdown will display the column headers from your data source (e.g., FirstName, Address, City).
- Insert fields to create the address block, adding spaces, commas, and line breaks (via Enter) as needed. For example:
- Optionally, add a return address manually in the upper-left corner of the envelope (static text, not merged).
- Tip: Use Match Fields (in the Insert & Write Fields group) if Word’s address fields don’t align with your data source headers.
4. Preview On The Envelopes
- Click Preview Results in the Preview Results group to see how the envelope looks with actual data from your source.
- Use the navigation arrows (Next Record, Previous Record) to cycle through records and verify that addresses display correctly.
- If errors appear (e.g., missing data), check your data source for inconsistencies or mismatched field names.
5. Complete The Mail Merge
- Once satisfied with the preview, go to the Mailings tab and click Finish & Merge in the Finish group.
- Choose one of the following:
- Edit Individual Documents: Creates a new Word document with one envelope per page for each recipient.
- Print Documents: Sends the merged envelopes directly to the printer (ensure envelopes are loaded correctly in your printer).
- For most cases, select Edit Individual Documents, then choose All in the Merge to New Document dialog to generate envelopes for all recipients.
- Word creates a new document with each page formatted as an envelope, populated with data from your source.
6. The Output
- Keep the merged document (e.g., MergedEnvelopes.docx) to keep your output organized.
- Try to save main envelope template document to reuse the mail merge setup later if needed.
How To Use Mail Merge In Word For Letters?
To use mail merge in Microsoft Word for creating personalized letters, you combine a main document (the letter template) with a data source (e.g., Excel spreadsheet, Outlook contacts, or a new list). This generates multiple customized letters efficiently. Below is a step-by-step guide, assuming you have a data source ready.
Step By Step Guide
1. Set Up The Letter Template
- Open Microsoft Word and create or open a document for your letter.
- Go to the Mailings tab on the ribbon.
- Click Start Mail Merge and select Letters. This activates mail merge mode for the document, turning it into the main template.
2. Select Recipients
- The mailing tab, press Select Recipients and choose:
- Use an Existing List: Browse to your Excel file (e.g., Recipients.xlsx). Select the sheet with data and click OK.
- Select from Outlook Contacts: Import from Outlook if applicable.
- Type a New List: Open the New Address List dialog, enter data under headers, click New Entry for more records, then save and link.
- Word connects to the source; updates to the file (if saved) will reflect dynamically.
3. Insert Merge Fields
- Type the static parts of your letter (e.g., “Dear “, body text, “Sincerely,”).
- Position the cursor where personalization is needed (e.g., after “Dear “).
- Click Insert Merge Field in the Insert and write Fields group. Select fields from the dropdown (e.g., FirstName, LastName).
- Add formatting like spaces, commas, or line breaks (via Enter).
- Use Address Block or Greeting Line buttons for quick formatted insertions, then customize if needed.
- Tip: Use Match Fields to map data source columns correctly.
4. Preview The Letters
- Click Preview Results in the Preview Results group to replace fields with actual data.
- Navigate through records using Next Record or Previous Record arrows to check for errors (e.g., blank fields).
- Adjust as needed; toggle back to fields view with Preview Results again.
5. Complete The Mail Merge
- Click Finish & Merge in the Finish group.
- Choose:
- Edit Individual Documents: Creates a new Word file with one letter per page for all recipients (recommended for review). Select All in the dialog.
- Print Documents: Prints directly (ensure printer setup).
- Send E-mail Messages: For email letters if data includes emails.
- Word generates the output with personalized data from your source.
6. Save & Manage Output
- Save the merged document (e.g., PersonalizedLetters.docx).
- Save the template separately to reuse.
- For large merges, filter recipients via Edit Recipient List before finishing.
How To Use Mail Merge In Word To Create Labels?
To use mail merge in Microsoft Word to create personalized labels (e.g., address or name labels) using a data source like an Excel spreadsheet, Outlook contacts, or a new list, follow these steps. This process automates the insertion of unique data into a label template, producing multiple customized labels efficiently.
1. Open Word And Set Up Label Template
- Launch Microsoft Word and open a new blank document.
- Go to the Mailings tab on the ribbon.
- Click Start Mail Merge and select Labels from the dropdown menu.
- In the Label Options dialog box, choose your label type (e.g., Avery US Letter, 5160 Address Labels, 30 per sheet). Select the vendor and product number matching your label sheets. Click OK.
- Word creates a table layout in the document, with each cell representing a label. If you don’t see the grid, enable Table Gridlines (under Table Design tab).
2. Select Or Create The Data Source
In the Mailings tab, press Select Recipients and choose:
- Use an Existing List: Browse to select your Excel file (e.g., LabelsData.xlsx). If multiple sheets exist, select the correct one and click OK.
- Select from Outlook Contacts: Import contacts from Outlook (requires Outlook integration).
- Type a New List: In the New Address List dialog, enter data under headers (e.g., FirstName, LastName, Address). Click New Entry for additional records, then save as a .mdb file.
Tip: Ensure headers are clear and match the fields you’ll use (e.g., Address, City).
3. Insert Merge Fields Into Label Template
- Click in the first label cell (top-left).
- In the Mailings tab, click Insert Merge Field in the Write & Insert Fields group. A dropdown will show your data source’s column headers (e.g., FirstName, LastName, Address).
- Insert fields with appropriate spacing and line breaks (via Enter). For example, for an address label:
- Alternatively, click Address Block for a preformatted address layout, adjusting settings if needed.
- After setting up the first label, click Update Labels in the Write & Insert Fields group to apply the merge field layout to all labels on the sheet.
4. Preview The Labels
- Click Preview Results in the Preview Results group to see the labels populated with data from your source.
- Use navigation arrows (Next Record, Previous Record) to check different records and ensure correct formatting.
- If data is missing or misaligned, verify your data source or use Match Fields to align headers correctly.
5. Complete The Mail Merge
- Once the preview is correct, go to the Mailings tab and click Finish & Merge in the Finish group.
- Choose an option:
- Edit Individual Documents: Creates a new Word document with all labels, useful for review or saving.
- Print Documents: Sends the labels directly to the printer (ensure label sheets are loaded correctly).
- Select Edit Individual Documents, then choose All in the Merge to New Document dialog to generate labels for all recipients.
- Word creates a new document with a full sheet of labels, each populated with data from your source.
6. Save The Output
- Keep the merged document (e.g., MergedLabels.docx) for reference or future edits.
- Save the original label template to reuse the mail merge setup.
How To Do Mail Merge In Word & Outlook?
To perform a mail merge in Microsoft Word using Outlook contacts as the data source, you can create personalized documents like letters, emails, or labels. This guide focuses on integrating Word and Outlook to produce customized letters or emails, leveraging Outlook’s contact list for recipient data. Below is a step-by-step process to execute a mail merge efficiently.
1. Set Up Word Document
- Open Microsoft Word and create a new or open an existing document to serve as your template (e.g., for a letter or email).
- Go to the Mailings tab on the ribbon.
- Click Start Mail Merge and select the document type:
- Letters for physical letters.
- E-mail Messages for sending emails via Outlook.
- Labels or Envelopes for other formats. For this guide, we’ll focus on Letters or E-mail Messages.
- If creating a letter, type the static content (e.g., “Dear [placeholder], Thank you for…”). For emails, include the email body.
2. Select Outlook Contracts As The Data Source
- In the Mailings tab, press Select Recipients and choose Select from Outlook Contacts.
- In the Select Contacts dialog, choose the Outlook contact folder (e.g., “Contacts” under your email account). If prompted, select your Outlook profile and click OK.
- A Select Data Source dialog may appear, allowing you to filter contacts (e.g., by category or specific fields). Select the desired contacts or choose all, then click OK.
- Tip: Ensure Outlook is running and you’re logged into the correct account to access contacts.
3. Insert Merge Fields
- Place the cursor where personalized data should appear (e.g., after “Dear” for a letter or in the email body).
- Click Insert Merge Field in the Write & Insert Fields group. A dropdown will list available Outlook fields (e.g., First_Name, Last_Name, E_mail_Address, Business_Street).
- Insert fields with appropriate spacing or line breaks (via Enter). For example, for a letter.
- For emails, include fields like «First_Name» in the greeting. Use Address Block for a preformatted address if needed.
- Tip: If fields don’t match your needs, click Match Fields to map Outlook fields to Word’s expected fields (e.g., map Business_Street to Street).
4. Preview Results
- Click Preview Results in the Preview Results group to see how the document or email looks with Outlook data inserted.
- Use navigation arrows (Next Record, Previous Record) to review different contacts.
- Check for errors (e.g., missing data). If fields don’t display correctly, verify Outlook contact data or adjust mappings via Match Fields.
5. Complete The Mail Merge
Go to the Mailings tab and click Finish & Merge in the Finish group. Choose an option based on your document type:
- For Letters:
- Edit Individual Documents: Creates a new Word document with one letter per contact. Select All in the dialog to include all contacts.
- Print Documents: Sends letters directly to the printer.
- For E-mail Messages:
- Select Send E-mail Messages. In the To box, choose the Outlook field containing email addresses (e.g., E_mail_Address).
- Enter a Subject line for the email.
- Choose HTML as the mail format (recommended for formatting).
- Click OK to send emails via Outlook. Ensure Outlook is open and configured.
Note: Emails are sent individually to each recipient, not as a bulk email with visible CC/BCC.
6. Save The Output
- For letters, save the merged document (e.g., MergedLetters.docx) for records or printing.
- Save the original template to reuse the mail merge setup.
- For emails, check Outlook’s Sent Items folder to confirm delivery.
FAQ(Frequently Asked Questions)
1. What is the difference between “Edit Individual Documents” and “Print Documents” in Finish & Merge?
- Edit Individual Documents: Creates a new Word file with one page per recipient (e.g., 100 letters = 100 pages). Ideal for reviewing, editing, or saving before printing.
- Print Documents: Sends merged output directly to the printer without creating a file. Use when you’re ready to print immediately (e.g., labels).
2. Why do some merge fields show blank or display «FieldName» instead of data?
Common causes:
- Data source not properly linked (reselect via Select Recipients).
- Excel sheet has blank rows, filters, or hidden columns.
- Field names don’t match (fix via Match Fields in Insert Merge Field group).
- File path changed (relink if Excel file was moved).
3. How do You create a greeting line like “Dear John,” or “Dear Smith Family,” automatically?
Use the Greeting Line button:
- Place cursor after “Dear “.
- Mailings → Greeting Line.
- Choose format (e.g., “Dear”, First Name, comma).
- Set fallback for missing names (e.g., “Dear Customer,”).
4. Can You filter recipients during mail merge (e.g., only customers in Texas)?
Yes!
- Mailings → Edit Recipient List.
- Click Filter → Set conditions (e.g., State = “TX”).
- Apply filter → Only matching records appear in merge.
5. How do You send personalized emails via mail merge using Outlook?
Requirements: Outlook installed, email addresses in data source.
Steps:
- Start Mail Merge → E-mail Messages.
- Link data source with an Email column.
- Insert merge fields in body (e.g., «FirstName»).
- Finish & Merge → Send E-mail Messages.
- Select email field, enter subject, choose HTML format → OK.
Final Takeaway
Hence, these are some of the crucial points regarding the mail merge in Word that you must be well aware off. Additionally, this can boost the scope of your brand value to a greater level. Ensure that you follow the correct process from your end.
You can share your views and opinion in our comment box this will help us to know your take on this matter. Follow the right process that can make things work well in your way.