.jpg)


Trial Balance In Tally Prime: A Complete Step by Step Process
Trial Balance in Tally Prime comprises the summary of all ledger balances in one place. Manually preparing the Trial balance can be a tedious task. If there is a mismatch in the Trial Balance, you must check the ledgers properly.
If there are any errors, then you need to maintain the ledgers manually but with the application of Tally Prime, you can maintain the ledgers and can view their correctness just at your fingertips.
You can easily verify the accuracy of your financial transactions. This will help you to maintain the total of Debit and credit balances altogether in perfect order.
Table of Contents
What Is A Trial Balance In Tally?
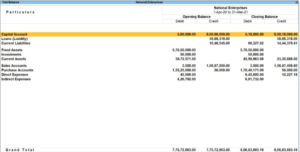
In Tally, a Trial Balance is a financial report that lists the closing balances of all ledger accounts in the books of accounts as of a specific date. It is used to verify the arithmetic accuracy of the accounting entries by ensuring that the total of all debit balances tallies with the total of all credit balances, as per the double-entry bookkeeping system.
How To View Trial Balance In Tally?
There are some simple steps to view the Trial Balance in Tally Prime. So, let’s explore the steps to have a clear idea of it.
- Press Alt+G > Select or Type Trial Balance> Press Enter
- Alternative option > Gateway of Tally > Display More Reports > Trial Balance

There are various configurations in the F12 (configure section). All these trial balances will allow you to view the report as per your need. For proper configuration, you may be required to view the opening balance of the trial balance. Now to view the opening balance of the trial balance you may be required to view the closing balance of the previous year.
- In the Trial Balance Press F-12 (configure) > Show Opening Balance> Yes
You can easily view the opening balance and closing balance side by side and can make a comparison between them.
- You can also view the transactions of your sales and purchases from a particular party by following this step. Press F12 > Set Show Transactions > Yes

You should set the Nett Transactions to Yes for merging credit and debit sides. If your debit side is more than your credit side, then you can see the Net Amount in the Trial Balance after adjustments.


How To Get A Detailed Trial Balance In Tally Prime?
There are some simple processes you will have to follow to get a detailed view of your trial balance in Tally Prime. Now, let’s explore those processes to have a clear insight into it.
1. Open Tally Prime
Launch TallyPrime on your computer.
2. Go To The Gateway Of Tally
From the main screen, you’ll be in the Gateway of Tally menu.
3. Assess The Trial Balance
- Navigate to Reports > Trial Balance (or press Alt+G to open Go To, type Trial Balance, and press Enter).
- Alternatively, go to Display More Reports > Accounts Books and Reports > Trial Balance.
4. Set The Date Range
The Trial Balance defaults to the current financial year.
To view for a specific period:
- Press F2 (Period) or click Date Range at the top.
- Enter the From and To dates, then press Enter.
5. Switch To Detailed View
Once the Trial Balance is displayed, press F1 (Detailed) or click Show Details (usually located in the top-right menu or toolbar).
This will expand the report to show:
- Sub-ledgers under each group.
- Individual ledger accounts with their respective debit and credit balances.
- Detailed breakdowns of transactions contributing to each balance.
6. Customize Detailed Trial Balance
- Group-wise View: Press Ctrl+B (Basis of Values) and select Group to organize by account groups (e.g., Current Assets, Liabilities).
- Filter Specific Ledgers: Press Ctrl+F or select Filter to display only specific ledgers or groups.
- Change Format: Press Ctrl+H (Change View) to switch between Gross, Net, or Extended Trial Balance for more detailed insights.
- Show Opening Balances: Press Alt+B to include opening balances for each ledger, if needed.
7. Verify Balances
- Check that the Total Debit equals the Total Credit in the detailed view.
- To investigate discrepancies, select a ledger and press Enter to drill down into Ledger Vouchers for transaction details.
8. Export Or Print
- To export the detailed Trial Balance: Press Ctrl+E or click Export to save as Excel, PDF, or other formats.
- To print: Press Ctrl+P or click Print for a hard copy.
Ways To Generate Receipt Notes In Trial Balance
There are some of the simple steps you need to follow to generate the receipt notes in Trial Balance. Suppose you purchased goods from any party and you get fined when you get the goods. For the acceptance of the goods, you get a receipt note. This is entered with a tracking number as it affects the Trial Balance.
-
- Press Alt +G > Type Or Select Trial Balance > Press Enter.
- Alternatively, Gateway of Tally > Display More Reports > Trial Balance.
- Press F5 Ledger-wise to view all the ledger reports.

Group Or Ledger Wise Trial Balance
You can easily cross-verify the opening balance of the Ledger in order to adjust all the differences in the opening balance. Additionally, you can easily view the Trial Balance in Tally Prime as per the groups of Ledgers in your books. Thus, it will help you to convert the ledger-wise report back into the group-wise report.
- Press Alt +G > Type or Select Trial Balance > Enter
- Press F5 to view all the ledger reports. Press F5 to return to group group-wise report.
- To manage all the detailed formats of the Trial Balance Press Alt +F5

Few Accounting related topics for your knowledge
- Cash Book In Accounting: Definition, Features, Format, Process, Faqs
- Chart Of Accounts In Tally Prime: A Definitive Guide For Beginners
- Top 11 Source Documents In Accounting: Overview, Importance, Types & Usages
- Top 20 Journal Entries Questions And Answers For Interview
- What Is Direct Tax? A Comprehensive Guide To Direct Tax
- Accounts Payable Process in SAP: Step by Step Guide
How To Access Trial Balance Report In Tally Prime?
You need to follow some of the simple steps to access the Trial Balance Report in Tally Prime. To get access to the Trial Balance report in Tally Prime you need to follow some of the simple steps. So, you must go through the process to have a clear insight into it.
1. Open TallyPrime:
- Launch TallyPrime on your computer.
2. Go to Gateway of Tally:
- From the main screen, you’ll be in the Gateway of Tally menu.
3. Access Trial Balance:
- Select Reports > Trial Balance.
- Alternatively, use the Go To feature:
- Press Alt+G (Go To).
- Type Trial Balance and press Enter.
- Another option: Go to Display More Reports > Accounts Books and Reports > Trial Balance.
4. View The Trial Balance:
- The Trial Balance report will display:
- Ledger accounts or groups.
- Debit Balance and Credit Balance columns.
- Total debit and credit amounts at the bottom (these should match if the books are balanced).
5. Set The Date Range (Optional):
- By default, the report covers the current financial year.
- To change the period:
- Press F2 (Period) or click Date Range at the top.
- Enter the From and To dates, then press Enter.
How To Import Trial Balance In Tally Prime?
You need to follow certain methods to import Trial Balance in Tally Prime. However, you need to follow the process to make things work perfectly in your way. Let’s explore the process to have a clear insight into it.
1. Prepare The Excel File
Create an Excel file with the following columns (example structure):
- Ledger Name: Name of the ledger account.
- Group Name: The group under which the ledger falls (e.g., Sundry Debtors, Current Assets).
- Opening Balance: The opening balance amount (specify Dr or Cr, e.g., 5000 Dr).
- Optional: Account Code (if using unique codes for ledgers).
- Save the file in Excel (.xlsx) or CSV format. Ensure the sheet name is “Sheet 1” or “Trial Balance.”
- Alternatively, use a tool like Excel2Tally to convert the Excel file into Tally-compatible XML format.
2. Convert Excel To XML
If you’re using a third-party tool like Excel2Tally.in:
- Download the appropriate Excel template from the tool’s website.
- Copy your Trial Balance data into the template.
- Upload the Excel file to the tool to generate a Tally-compatible XML file.
- Save the XML file to your computer.
3. Open Tally Prime
Launch TallyPrime and open the company where you want to import the Trial Balance.
4. Assess The Import Option
- From the Gateway of Tally, go to Import > Masters (for ledger creation) or Transactions (if importing opening balances as vouchers).
- Alternatively, press Alt+O (Import) from the Gateway of Tally.
5. Import Ledger Masters
If the ledgers in your Trial Balance are not already created in TallyPrime:
- Select Import > Masters.
- Choose File Type as XML or Excel (if TallyPrime supports direct Excel import in your version).
- Specify the File Path where your XML or Excel file is saved.
- Set Import Behavior:
- Create: To create new ledgers if they don’t exist.
- Modify: To update existing ledgers with new opening balances.
- Combine: To combine new and existing ledgers.
- Press Enter to start the import.
- Check the import log (Tally.IMP file) for any errors (e.g., duplicate account codes or missing groups).
6. Import Opening Balances
To import opening balances as transactions:
- Go to Import > Transactions.
- Select the XML file containing the opening balance data (generated from Excel2Tally or manually created).
- Specify the File Path and ensure the file includes ledger names and their respective opening balances (debit/credit).
- Press Enter to import.
- Verify the import log for errors. If data isn’t imported, check for issues like incorrect ledger names or missing groups.
7. Verify Trial Balance
- After importing, go to Reports > Trial Balance (or press Alt+G, type Trial Balance, and press Enter).
- Check if the imported ledgers and their opening balances appear correctly.
- Press F12 (Configure) and set Show Opening Balance to Yes to verify the imported balances.
- If there’s a Difference in Opening Balances, review the ledgers:
- Go to Alter Master > select the ledger > update the Opening Balance field.
- Ensure the total debit and credit balances match.
8. Resolve Errors
Common import issues include:
- Duplicate ledger names or account codes.
- Missing parent groups in TallyPrime.
- Incorrect debit/credit format in the Excel file.
- Zero balance accounts (some tools skip these).
- Check the Tally.IMP log file for error details and correct the Excel/XML file accordingly.
- Re-import after fixing errors.
More related topics for you
- Capital and Revenue Transactions: Understand the Basics
- Master Key Accounting Concepts and Conventions: Essential Guide for Financial Clarity
- Income from House Property: A Taxpayer’s Guide
- Chart of Accounts in Accounting: Structure, Benefits, and Examples
- Accounts Payable Process: Optimizing Cash Flow
- General Ledger Accounting: Financial Management Guide
- Mastering Balance Sheet Statement: From Assets to Equity
Key Take Away
Hence, if you want to extract files of the Trial Balance in Tally Prime, then you must go through the mentioned details. This will help you to meet your goals with complete accuracy. As things can turn worse for you in the long run.
Maintaining a Trial balance with the help of Tally Prime Software can make your task easier at the time of audit. So, you must try out things that can make things easier and effective for you in the long run.